")
Adventure #21 to Denmark - Fastelavnsboller (Danish Carnival Buns)
14th Feb 2024
The prequel: It's been a while. Like...almost two years a while. My life took a turn, shall we say. My mom died, then my dad got sick / died, then my dog died, then I closed my brick and mortar store. Mhm...as I said, my life took a turn. But the important thing, when your life takes a turn, is to nurture yourself, take care of what needs taken care of, and to heck with the rest. Seriously. So here I am...stronger, more focused, doing what I love...and finally sticking my toe back into my kitchen adventures. It was only fitting that my first adventure back is today...Fat Tuesday. My mom always made donuts on Fat Tuesday. When she was no longer able, I picked up the fatty bit of goodness torch (documented in my very first kitchen adventure). It seems every European country has their own delightful treat this time of year to celebrate, so having made fastnachts a couple times, I've decided to travel to another land and attempt to create the mighty Danish Carnival Buns.
Pre-adventure Jitters: The recipe mentions filling explosions, so I'm questioning if I should be wearing an apron or a hazmat suit. I'm not typically even an apron kind of cook, but with the advanced warning, we're taking precautions. Armed with my recipe from skandibaking.com, and the aforementioned apron, the adventure begins.The Adventure: The shopping list is non existent. The origination of these pastries at the start of Lent stems from the need to use up what was in the larder. It's not meant to be creative and use freaky bits and pieces. They're old school. So, I have everything. Suhweet!

I start first thing in the morning making my custard...what they call kagecreme. Throw the ingredients in the base of a tall sided bowl..."whisk vigorously". Right. It's 7 am. I'm not whisking vigorously. I'm barely measuring with any accuracy. I grab the immersion blender, throw on the whisk attachment and give it my all. The fast moving wires hit the cornstarch and a puff cloud of immense proportions comes shooting out of the bowl. It's everywhere. Legit everywhere...on the blender, the counter, my clothes, up my nostrils...everywhere. What a rookie mistake! I'm already committed though, so I adjust the angle of the blender and continue on. Get the egg mixture well blended, and turn back to the pan of milk. I started heating it before I began whisking and turned my back. You know what they say about turning your back, right? I catch it right before it boils over the top of the pan. Seeeeriously. There's a reason I don't do these recipes in the morning. I'm a hot mess before 10. Pour a little milk in the eggs (while whisking), pour the mixture back in the pan (whisk, whisk, whisk), boil up and shazam! It did exactly what it was supposed to! I HAVE DANISH CUSTARD! Gotta say, I'm tempted to call it done and enjoy the custard on its own, buuuttt that's not the deal. I stuff it in the fridge to cool and start the dough.
Two words...dough setting. Yup. I dumped it all in my bread machine and let 'er rip. If you've never used your dough setting, I'd highly recommend it. It makes all sorts of bread making a breeze. Dump, walk away, come back in 90 minutes and you're ready to go. The beeper goes off, I dump out the dough and divide into 12 pieces with my pizza cutter. It's time to make some buns! First piece goes into my hand and I try to roll it into a ball. Not balling. No where's close to looking like a nice round piece of dough. Dammit. I cover them up to raise and walk away. Maybe they'll fix during the raising process. Twenty minutes later I come back. Nope. Didn't fix themselves.
I grab the first one and flatten it out into a circle. I slap on a little creme and before I can get the edges pinched up it shrinks in size. This stuff is elastic! I use my finger to squish the creme back to the center and stretch it back out to start pinching. The pinch isn't working. There's no stick going on. The dough is elastic AND belligerent. I aggressively pinch and squish like my life depends on it and finally get my little bun together. It's lookin' rough. I mean...really rough, but it is what it is. I move on to the next bun, hoping the first was a fluke annnddd it wasn't. Every one of those 12 buns is a mess. I cover them up to raise and walk away, knowing this raise also won't fix anything. Thirty minutes later I return, egg wash the top, and flop my sad looking little buns into the oven. The buzzer goes off and I'm almost afraid to look. Did they explode in the oven? Do they still look all cattywampus? I peek into the oven and THEY'RE GORGEOUS!
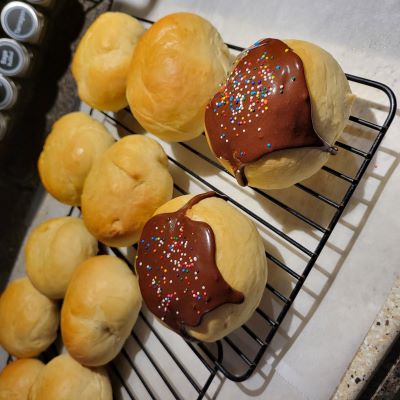
I make my frosting (with a double up on the cocoa powder, since there's no such thing as too much chocolate) and slather it on once they've cooled. The biggest puffiest of the buns is calling my name. I grab it, take a bite, and... Ooooooohhhh. These are amazing. The sweet creme in the center is perfect with the cardamom bun. I can't help myself and grab a second. It IS Fat Tuesday after all. This adventure was a beast, but I'm so glad I powered through. I may just have to declare myself Danish for next year as well! On to the next adventure!
The Recipe - Fastelavnsboller
Ingredients:
Dough
- 150 ml (2/3 cup) milk
- 2 tsp instant yeast
- 1 large egg
- 1 egg yolk
- 50 grams (1/4 cup) sugar
- 1/2 tsp vanilla extract
- 1/2 tsp cardamom
- 1/2 tsp salt
- 375 grams (3 cups) all-purpose or bread flour
- 57 grams (4Tbsp) unsalted butter, softened
Filling and Decoration
- 1/2 portion kagecreme (see below)
- 1 egg for egg wash
- powdered sugar
- cocoa powder
- water
Instructions:
- Make kagecreme and put in fridge. It needs to be cool, so give it a couple hours.
- Add the instant yeast to the milk in a small bowl and set aside.
- Combine the egg, egg yolk, sugar, vanilla, cardamom, and salt in a large bowl. Add the yeast and milk mixture and mix well
- Slowly add the flour and the softened butter, stirring with a wooden spoon. Once the dough starts to come together, you can start kneading.
- Kneed until smooth and elastic, probably around 10-15 minutes. Add a bit of flour if the dough sticks to your hands or the surface. The texture of your dough before its first rise should be soft and smooth, not sticky and not too dry.
- Cover and let your dough rise for about 45 minutes, or until doubled in size.
- Once the dough has risen, dump it out on a flat surface. Divide into 12 equal pieces, and shape into buns. (Take a piece, pinch together into a ball shape, then cup it in your hand with the top of the roll touching your palm. Place your hand on an unfloured surface with the seam touching the table. Move your cupped hand in quick, tight circles - this will cause the seam to come together and create tension on the surface of the dough.)
- Let the buns rest for about 20 minutes on the table, covered with plastic wrap or a damp dishtowel. I also like to spray or brush the tops of the dough with a bit of vegetable oil, just to make sure they don't form any skin or dry spots.
- Fill the buns with kagecreme. Take a bun, place it on your table dome side down (seam side up), and flatten it, just by hitting it with the heel or palm of your hand. You may need to pick up the circle of dough and use your hands to enlarge the circle a bit. Either pipe or spoon a dollop of filling (only a few teaspoons or the buns will explode) into the center of the dough circle. Pull up the sides and pinch them together. You do not need to do anything else to shape the buns at this point! This will only create weak spots where the filling can run out during baking. Place your filled bun on a baking sheet lined with parchment paper.
- Let the filled buns rise another 30 minutes. In the meantime, preheat your oven to 350 F.
- Once your buns are roughly doubled in size, egg wash the buns. Then bake them in the preheated oven for 12-14 minutes, or until golden brown and hollow sounding.
- Let the buns cool on a wire rack. Once cool, prepare your decoration. Mix together about a cup of powdered sugar, a TBSP of cocoa powder (to start) and a tiny bit of water. Keep adding water, or sugar, or cocoa powder until the icing reaches the consistency and taste that you like.
- Spoon the icing onto each bun, letting it drip down the sides. Let the icing harden a bit and enjoy!
Kagecreme ingredients:
- 3 large egg yolks
- 50 grams sugar
- pinch of salt
- 1 tsp vanilla extract
- 25 grams cornstarch
- 400 ml whole milk
- 28 grams unsalted butter
Instructions:
- Combine the egg yolks, sugar, salt, vanilla, and cornstarch in a large heat-proof bowl. Whisk vigorously until smooth.
- Heat the milk in a saucepan on medium heat. You may need to stir or whisk occasionally to prevent any of the milk solids from sticking to the bottom of the pan. Once the milk starts to very lightly simmer, with small bubbles forming around the edges, remove it from the heat. Pour half the milk into the egg mixture, while whisking vigorously to prevent the eggs from clumping together. It helps to put a towel underneath the bowl to help prevent it from sliding around.
- Pour the egg and milk mixture back into the saucepan with the rest of the milk and whisk. (It's easiest to do this off the heat.)
- Place the saucepan back on medium heat and continue to whisk. Once the mixture is heated through, it should start to thicken. (note: for the starches to thicken, it needs to get up to near boiling point) Whisk for about 30 seconds after bubbles start to break the surface to ensure the starch has fully thickened the mixture. Remove from heat and add the butter, whisking until it melts into the mixture.
- Transfer to a bowl and cover with plastic wrap, making sure that the plastic wrap touches the surface of the cream to avoid a skin forming. Refrigerate for 1-2 hours or until cooled. Then you can use the pastry cream to fill pastries, use in cakes, or for whatever you like.